| DXT360 provides a streamlined process for generating raw data, ensuring that users can extract insights efficiently while maintaining structured file organization. Whether you're pulling data for in-depth analysis, reporting, or archiving, the platform offers custom file naming and real-time validation to improve workflow and file management. |
| |
| DXT360 offers two methods for generating and downloading raw data in Excel format. You can either generate the raw data through ‘My Data’ tab to extract data directly based on applied filters or initiate the data generation from the ‘Exports’ section, which allows for structured reporting and scheduled exports. Below is a detailed step-by-step guide on how to generate and customize your raw data. |
| |
| Generating Raw Data from ‘My Data’ Tab |
| The ‘My Data’ section allows users to generate raw data based on filtered datasets. Follow these steps to extract raw data efficiently: |
| |
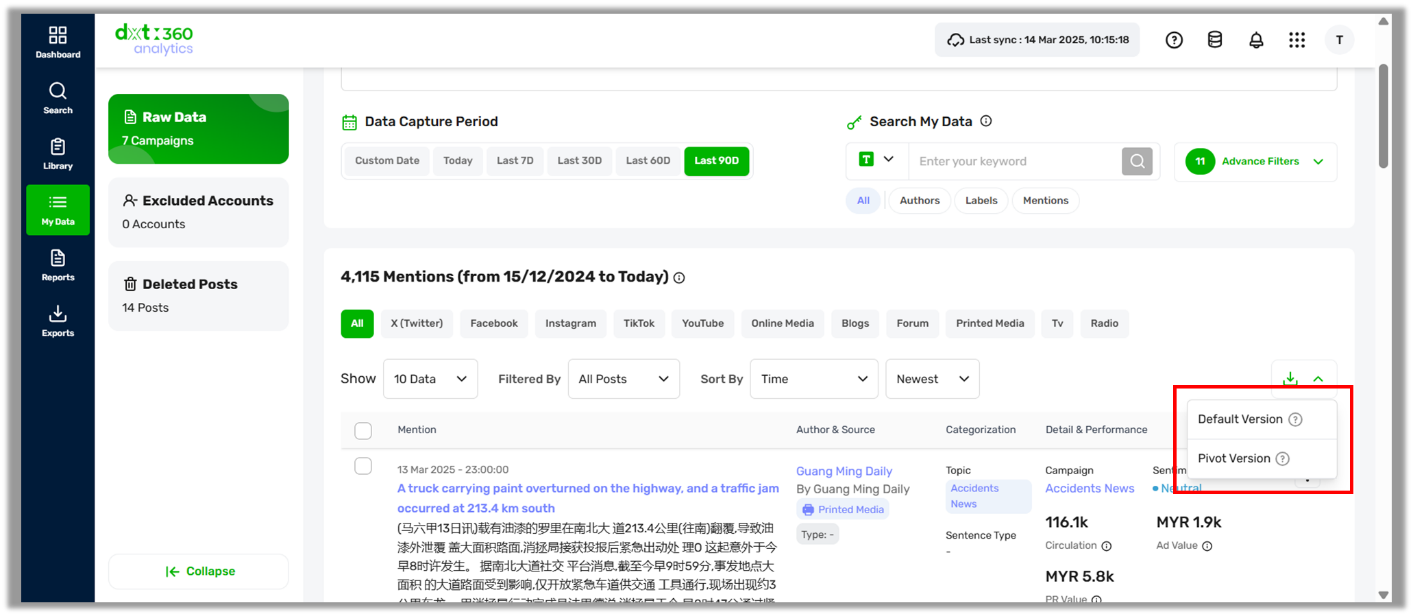
On the sidebar menu, navigate to ‘My Data’ tab then click the  button to start generating your raw data. You are allowed to generate up to 100,000 records per file. button to start generating your raw data. You are allowed to generate up to 100,000 records per file. |
 |
| |
| After that, select your preferred format for your generated raw data from the dropdown options. |
- Choosing ‘Default Version’ will generate raw data in a flat table format, where each row represents a single post or media mention, making it ideal for detailed post-level analysis, manual filtering, and tracking individual engagements.
- Selecting ‘Pivot Version’ will structure the data into a summary-friendly format, grouping insights by campaign, media type, or engagement metric, which is best suited for trend analysis, comparative reporting, and high-level performance reviews.
|
| For an in-depth explanation of data generation format options, read 'Optimizing Data Exports: Choosing the Right Format for Your Reports', where you'll find a breakdown of the Default Version and Pivot Version, their use cases, and how to choose the best format for your reporting needs. |
 |
| |
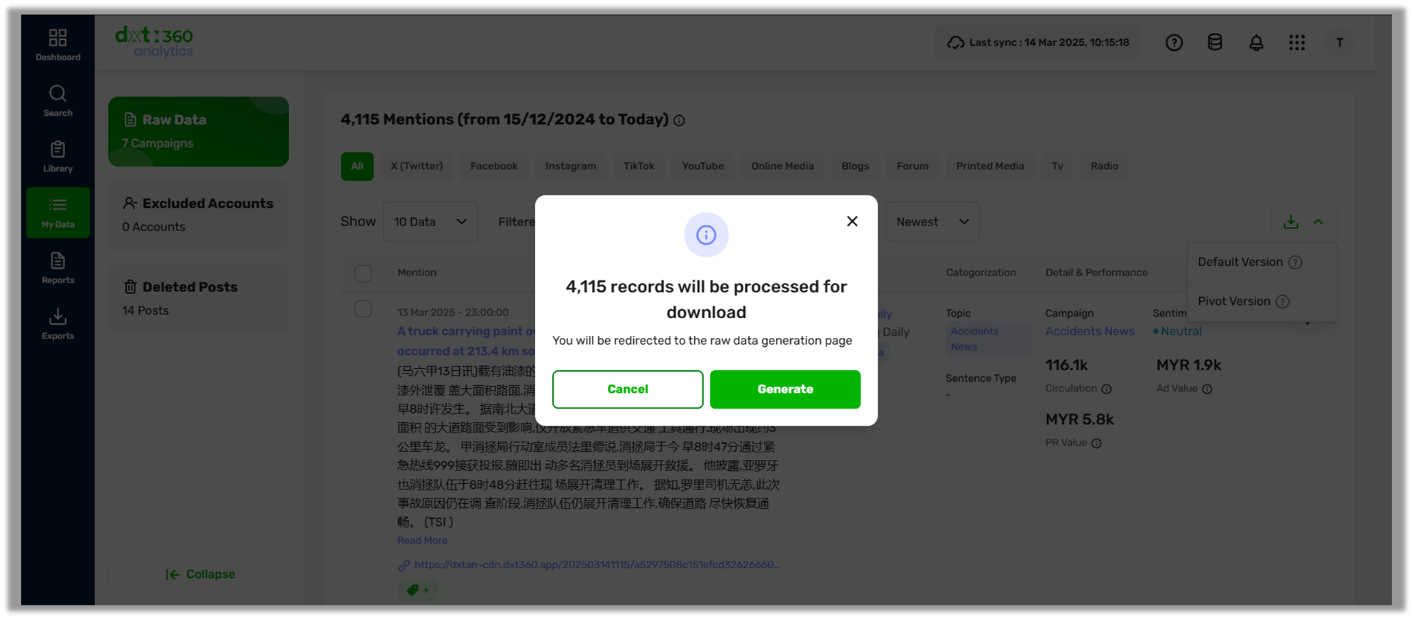
| If you choose the ‘Default Version’, a confirmation pop-up will appear showing the total number of records to be processed for download. Click ‘Generate’ to start exporting or select ‘Cancel’ to abort the process. |
 |
| |
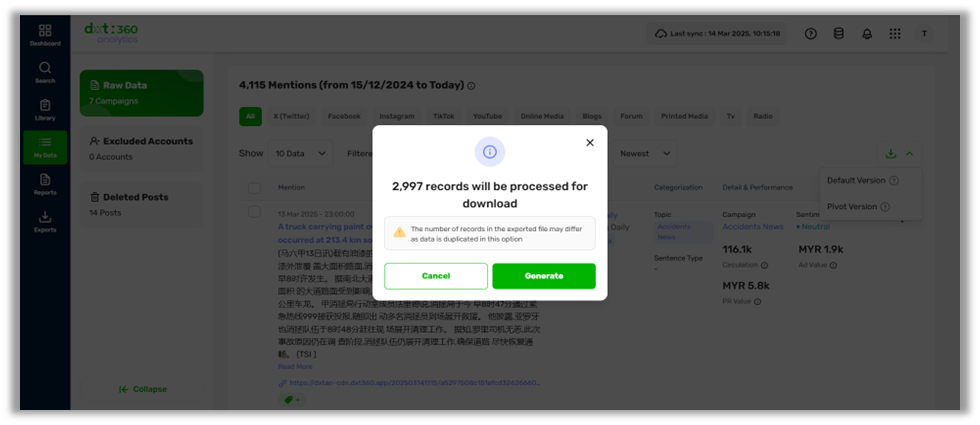
| If the ‘Pivot Version’ is selected, a confirmation pop-up will appear displaying the total number of records to be generated. Please note that the number of records in the exported file may differ due to data duplication in this format, as the format restructures data for grouped analysis. Once reviewed, you can proceed by clicking ‘Generate’ to initiate the export or select ‘Cancel’ to stop the process. |
 |
| |
| Customizing Your Raw Data Name |
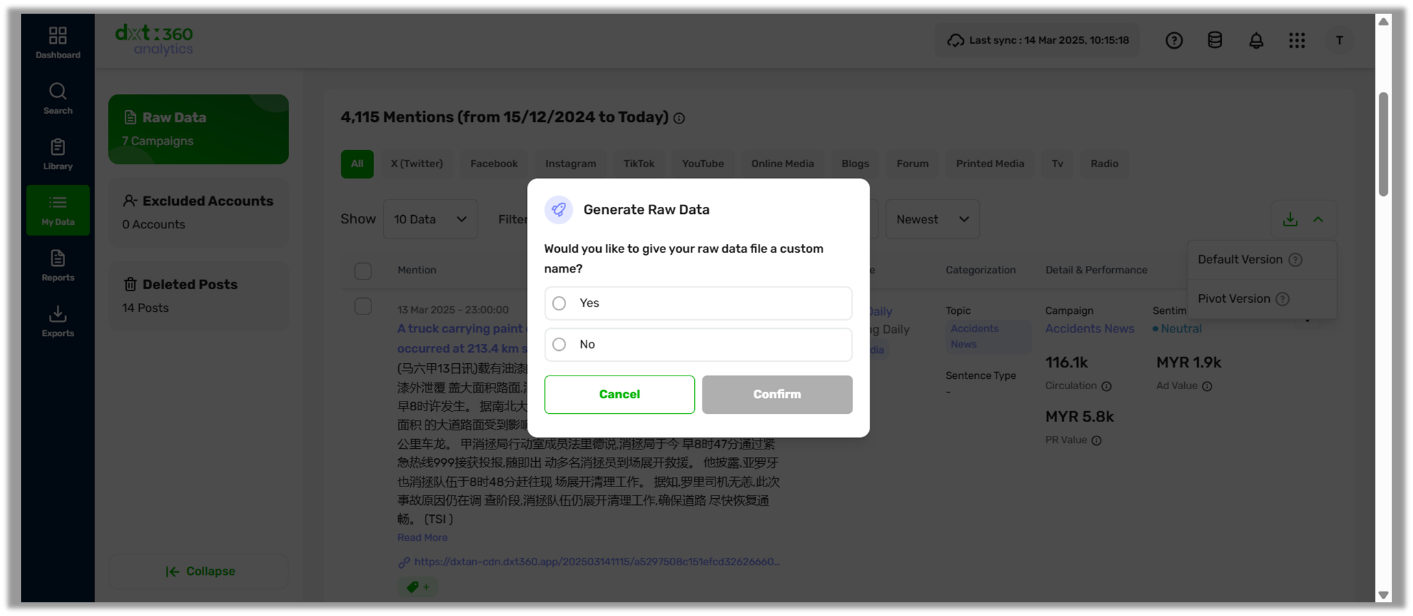
| After clicking the ‘Generate’ button, a prompt will appear asking if you want to assign a custom name to your raw data file. |
 |
| |
| If you select ‘Yes’, you will be able to enter a custom file name before proceeding. If you choose ‘No’, the system will automatically generate a default file name. Once you make a selection, the ‘Confirm’ button will be activated, allowing you to proceed with the file generation process. |
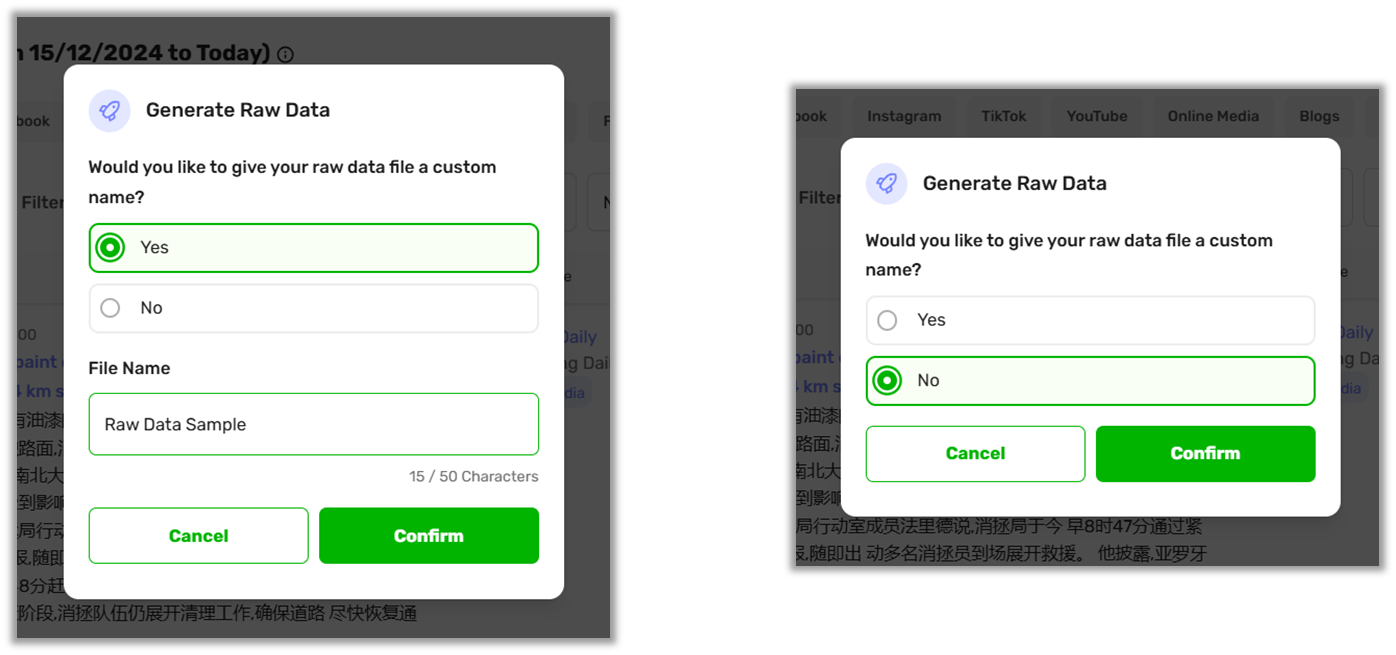 |
| You can enter a custom file name with a maximum of 50 characters. Ensure that your file name does not include restricted characters (\ / : * ? " < > | ! @ $ % ^ & + = { } [ ] ; , ). If a duplicate file name is detected, the system will automatically append a number (e.g., "Report_X" → "Report_X (1)"). Click ‘Confirm’ to continue. |
| |
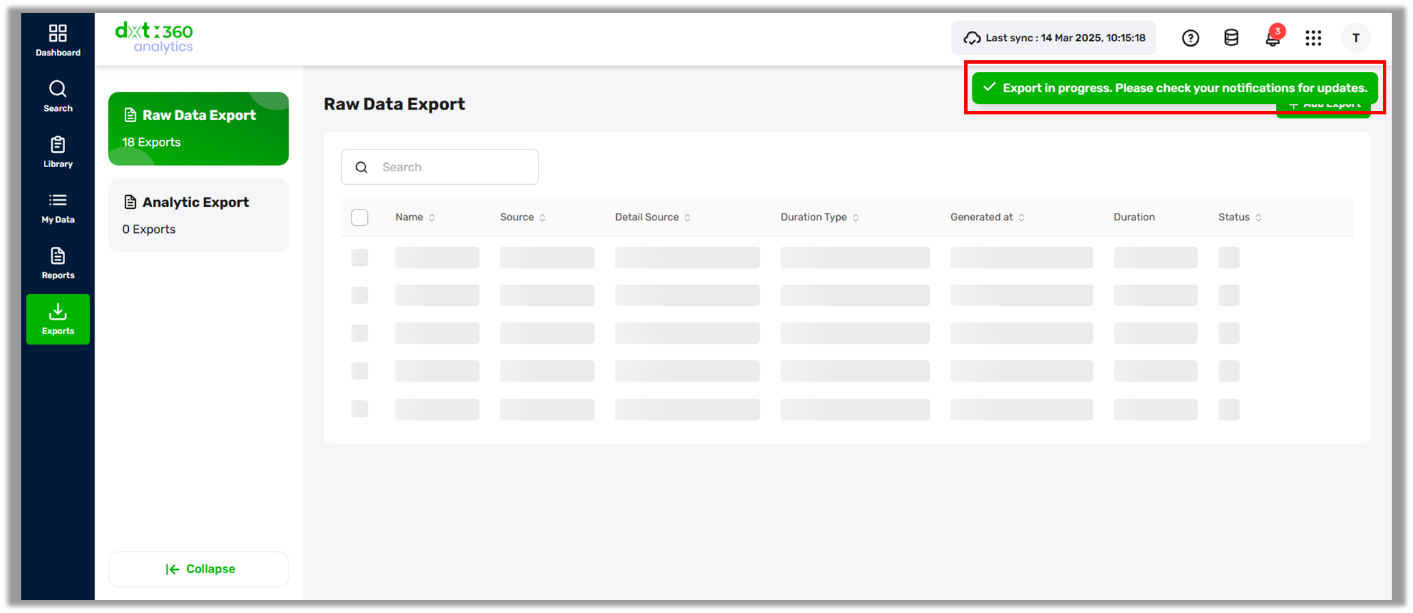
| An 'Export in progress. Please check your notifications for updates.' toast message will appear, indicating that the raw data export process has started. You can monitor the progress and receive updates by checking your notifications panel. |
 |
| |
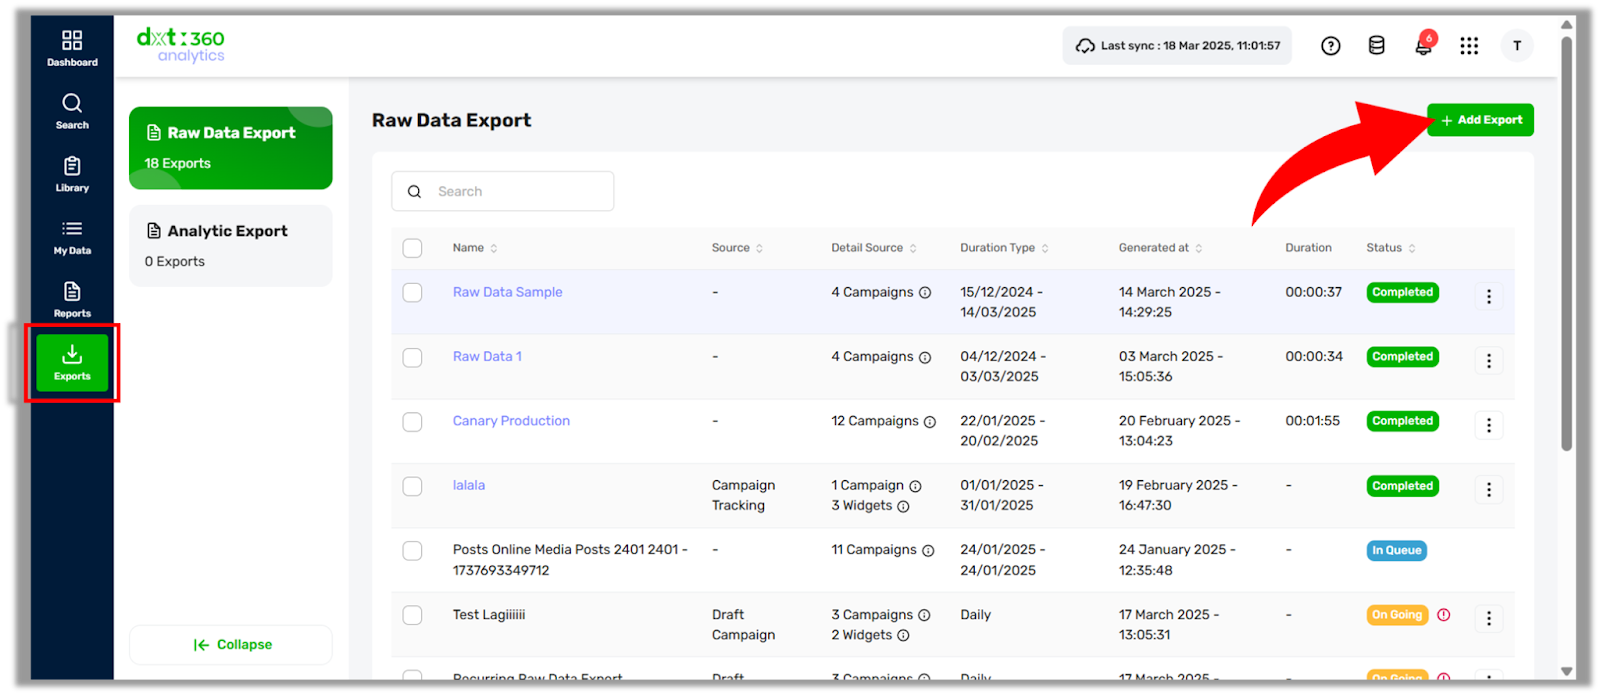
| Once the export process is completed, you can check the status progress in the Raw Data Export page. Locate your exported file in the list, then click the kebab menu (⋮) next to the selected entry for further actions: |
- Select ‘Download’ to save the exported raw data file to your device.
- Choose ‘View Export’ to review the report details and verify the extracted data before downloading.
- Click ‘Delete’ to remove the export from the list if it is no longer needed.
|
| |
| Generating Raw Data from ‘Exports’ Section |
| You can also extract data directly from the ‘Exports’ section. This step is particularly useful for automating scheduled reports, extracting structured campaign summaries, and organizing large-scale data exports without manual intervention. The following guide will walk you through the process. |
| |
| On the sidebar menu, navigate to ‘Exports’ tab then click the ‘+ Add Export’ button to create a new raw data export. |
 |
| |
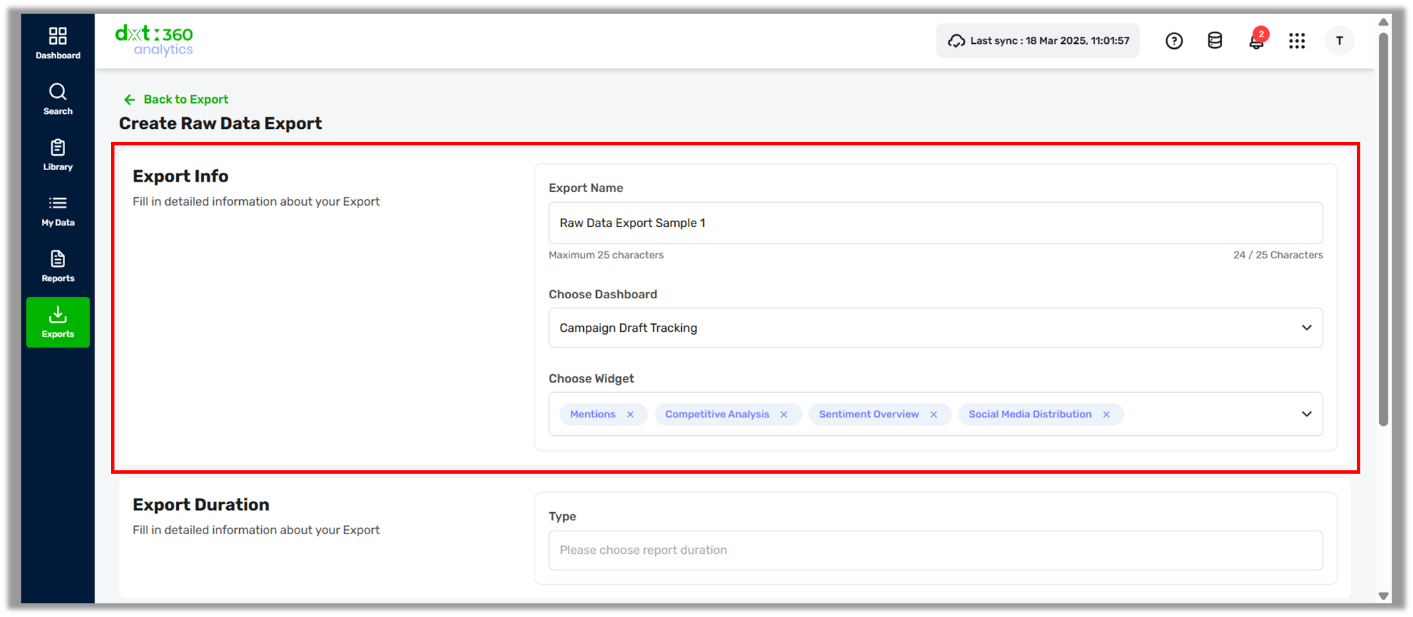
| In the ‘Export Info’ section, fill in the detailed information about your export. Enter an export name (max 25 characters) that clearly identifies the data. Next, choose a dashboard from the list of previously created dashboards, then select the widget(s) associated with that dashboard to ensure only the most relevant data is included in the export. |
 |
| |
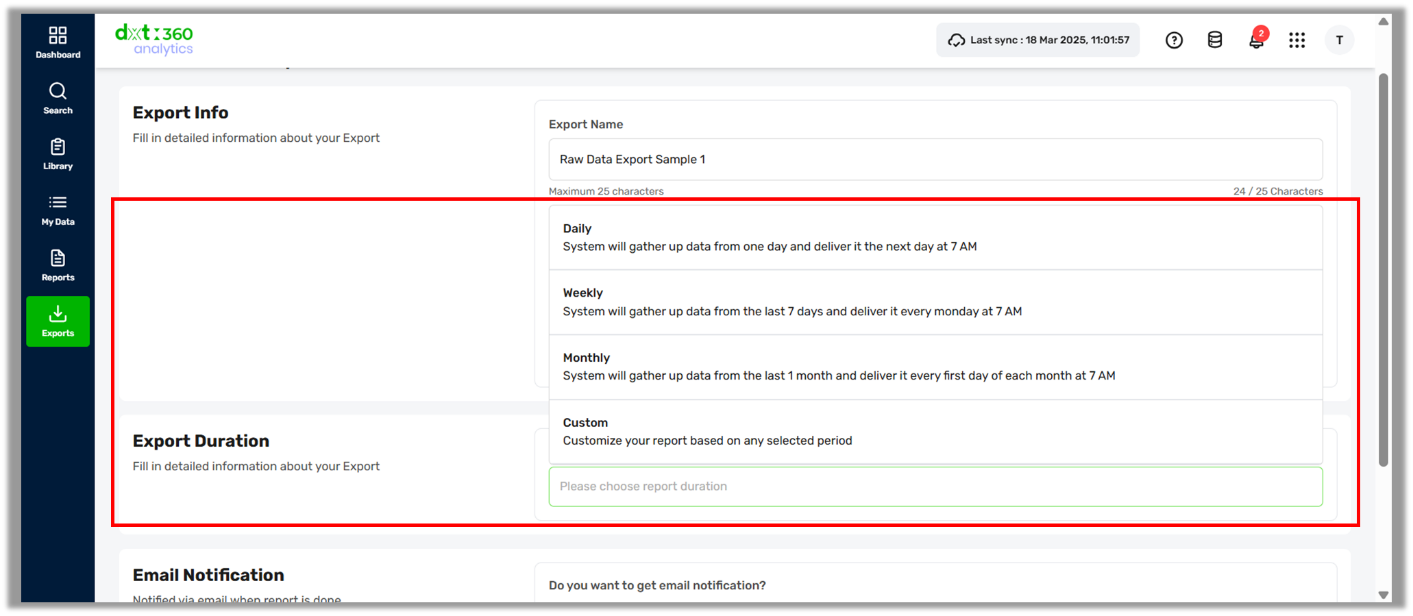
| Next, in the ‘Export Duration’ section, define how frequently the system should generate your report. Choose a recurring option—Daily, Weekly, or Monthly—for automated data exports, ensuring a consistent flow of insights. If you need a one-time export, select ‘Custom’ and specify a specific date range to generate data tailored to your reporting needs. |
 |
| |
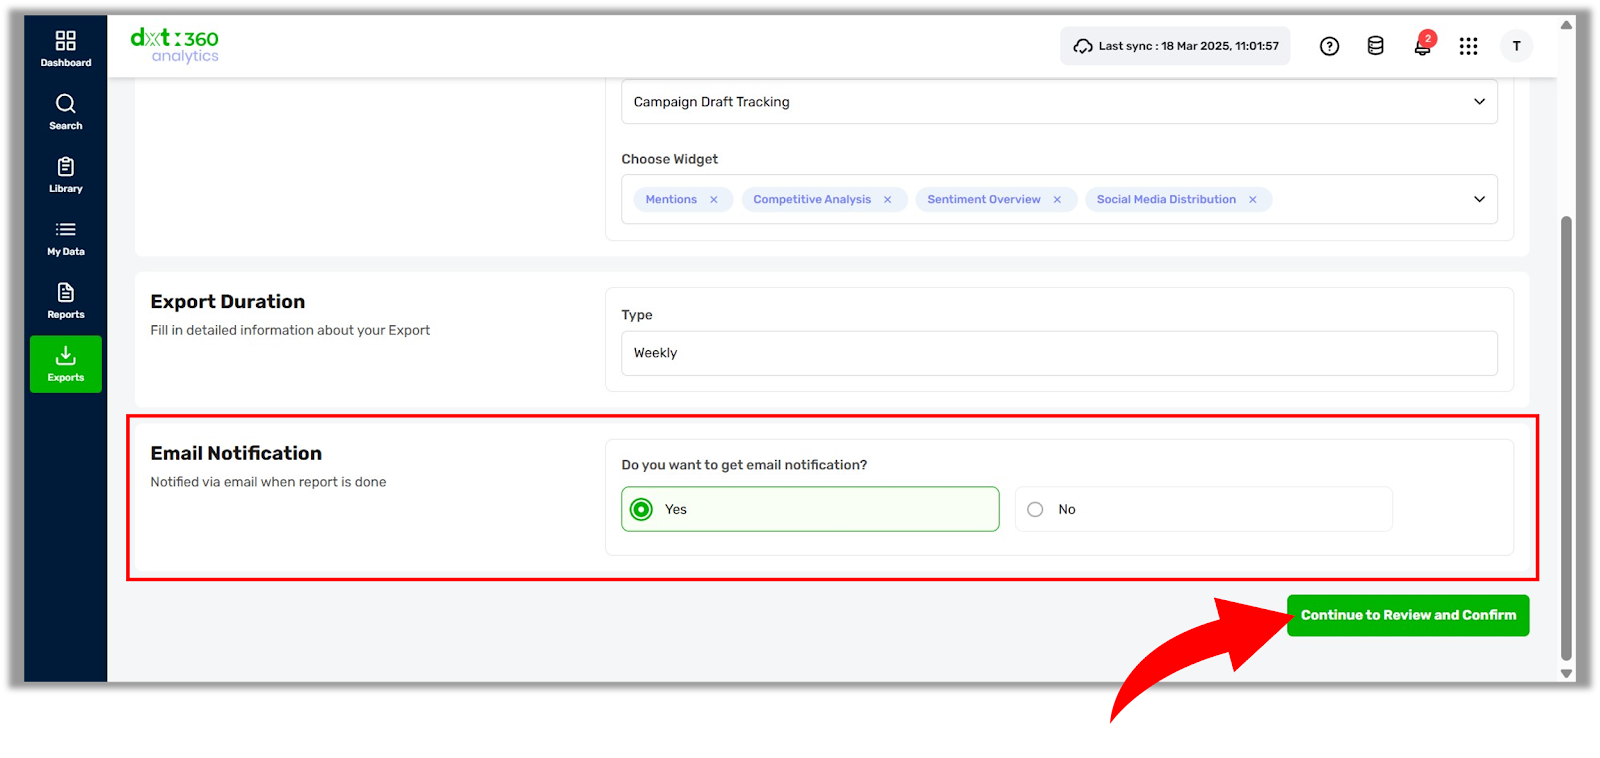
| In the ‘Email Notification’ section, choose whether to receive an email alert once the export is complete. Double-check all the parameters to ensure accuracy before clicking ‘Continue to Review and Confirm’ to proceed. |
 |
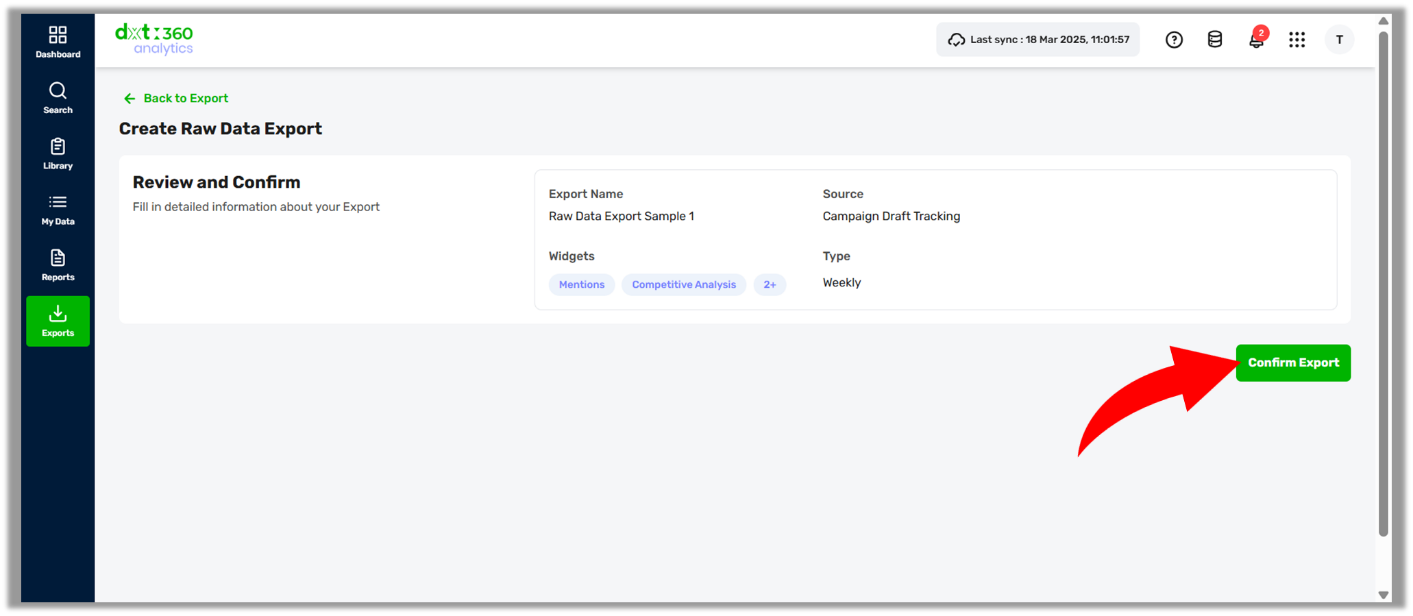
| Once reviewed, click ‘Confirm Export’ to begin processing. |
 |
| |
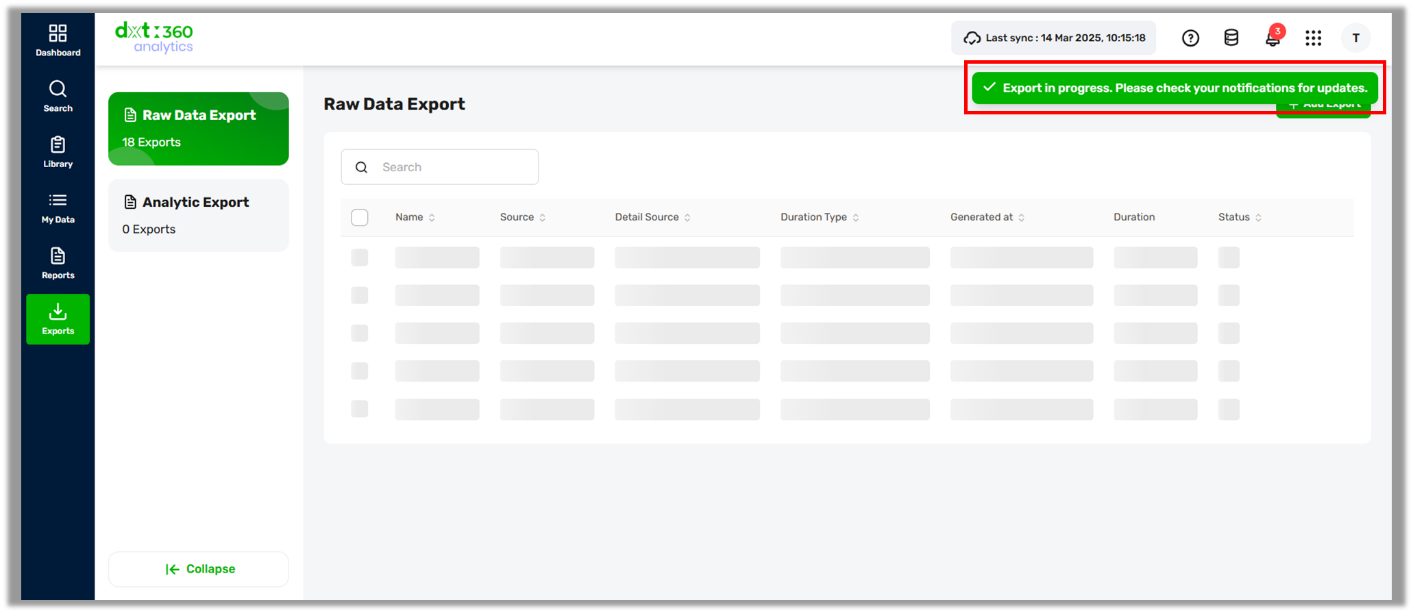
| An 'Export in progress. Please check your notifications for updates.' toast message will appear, indicating that the raw data export process has started. You can monitor the progress and receive updates by checking your notifications panel. |
 |
| |
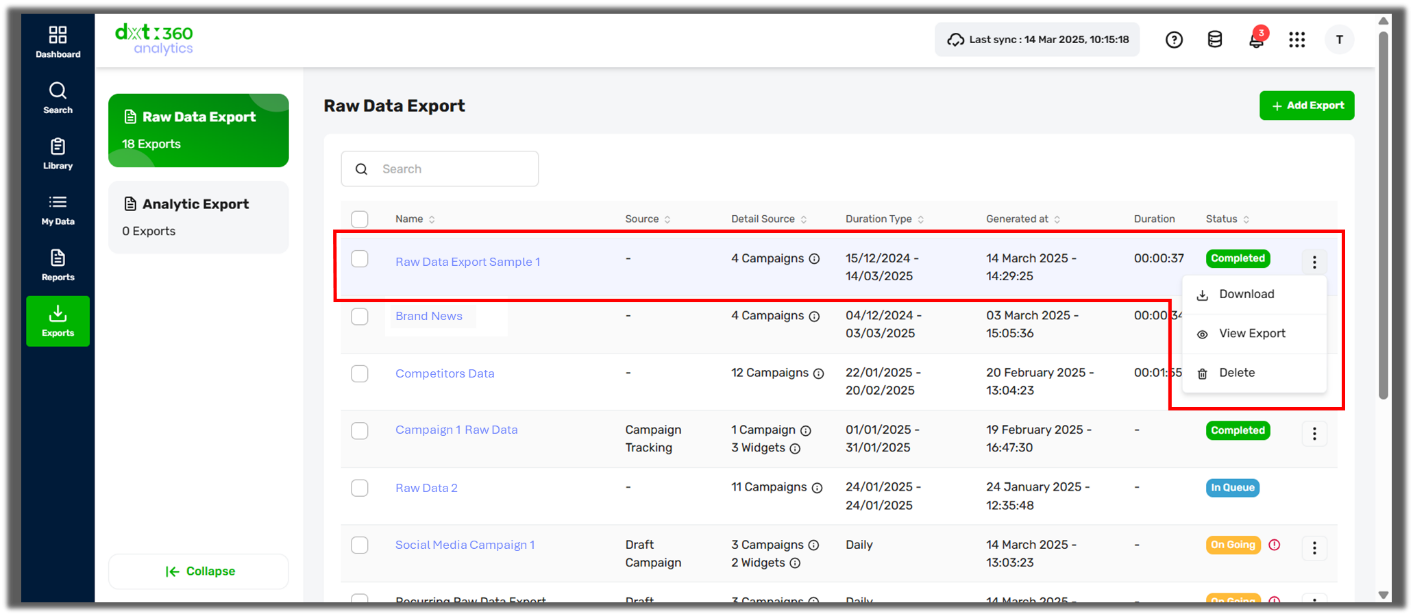
| Once the export process is completed, you can track its status and progress in the Raw Data Export page. Locate your exported file in the list, then click the kebab menu (⋮) next to the selected entry to access the available actions: |
- Select ‘Download’ to save the exported raw data file to your device.
- Choose ‘View Export’ to review report details and verify the extracted data before downloading.
- Click ‘Delete’ to remove the export from the list if it is no longer needed.
|
 |
| |
| Start using the Raw Data Export feature today to unlock the full potential of your data and simplify your workflow. 🚀 |
| |
| Need help choosing the right export format? Check out ‘Optimizing Data Exports: Choosing the Right Format for Your Reporting Needs’ for a side-by-side breakdown of the Default and Pivot versions and when to use each. |
